When modding a coffee machine, it is easy to overlook questions around just how to connect up the wiring. The space the wiring occupies can be very hot. Just the air can easily be over 70°C and if the wire touches the boiler itself, that can be well over 100°C. Some wires also have to carry fairly large currents and mains voltage. The large currents cause extra heating and the large currents and voltages both cause electromagnetic interference.
Here are some wiring tricks I have learnt over the years.
What kind of wire won’t melt / catch fire?
The insulation on most wire can’t handle the temperatures. This is particularly true of mains voltage wires which also often carry high currents – so they generate their own heat – and are often physically touching some part of the boiler. I have been using 18AWG silicone insulated wire. This appears to handle the current and heat very well. For logic wires, though, I have got away with any old wire I had handy.
Also be careful to get tinned copper wire. Bare copper oxidises easily, and more so at high temperatures. Unfortunately copper oxide is a conductor, so current flows through it, but it is a poor conductor, so it drops quite a large voltage. Power = voltage x current. That means the copper oxide layer makes an excellent heating element. This, in turn increases the rate at which the copper in the wire oxidises. This continues until something starts burning.
Connecting mains wires to other things
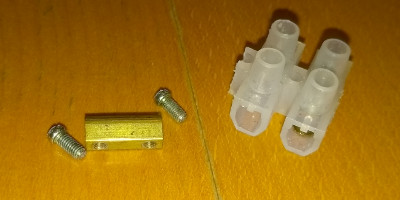
You often can’t get away with soldering wires. The temperatures get too high and the solder melts. And, anyway, soldering wires is fiddly. I have found crimp terminals and screw terminals can work well. A top tip is to use ferrules around the ends of the wires. I bought a box full of them:
 Just slip the smallest ferrule that works over the end of the wire, and insert it into the crimp/screw space. This makes for a very easy and neat job. I have found sometimes I also have to cut the ferrule shorter. Do this after inserting the wire not before because cutting the ferrule tends to crush it.
For joining wires to other things, like thermal fuses or heating elements, the barrel inside a “chocolate block” connector is great. [Edit 9 May 2023: I now prefer crimps for the thermal fuse and there’s a much better solution for the boiler terminals.] The plastic insulator generally cannot handle the temperature, so I use just the barrel and slide a bit of silicone tubing over the completed assembly. Sometimes it helps to cut the screws shorter.
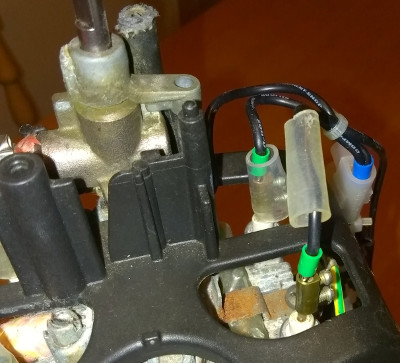
That’s silicone insulated tinned copper wire with ferrules and chocolate block barrels. One with the silicone tubing slid back and one with it in place. If you squint just right, you can also see a thermal fuse on the top of the boiler with the same trick. I give credit for the silicone tubing idea to Gaggia who use this trick for this thermal fuse themselves.
To remove the barrel, undo the screws all the way, find something to poke inside and push them out and then the barrel slides out easily.
 Electromagnetic interference
Whenever possible, run wires as twisted pairs: This applies to logic wires (e.g. a pair of wires to a switch) just as much as mains wires (e.g. a pair of wires to a heater element). For logic wires, it means they are much less susceptible to inductive coupling and for mains wires it means they generate a lot less inductive noise. In early attempts at a PID controller, I found the microcontroller kept rebooting because of voltage spikes picked up through inductive coupling.
Keep mains wires and logic wires away from each other: This isn’t always possible, but do so as far as you can. This helps reduce capacitive coupling. I bunch the mains and logic wires together into looms with cable ties.
Terminate logic wires with a low impedance path to ground: Basically, this means any wire leading to an analogue or digital input should have a capacitor to ground on the PCB. I have found 10nF works well. DC supply lines like 5V or GND already have a low impedance path to ground, so no need to use caps for them.