One of the saddest sounds in the world is the change in tone of the water pump as the water runs dry half way through a shot. There’s no real rescuing this situation. It’s go ahead with a sub-par cup of coffee or start again. Not only is that a wasted 40p of coffee beans1For a double shot. but, worse, it dishonours the farmers, roasters and everyone else who has put so much effort into bringing such a wonderful flavour to you from the far reaches of the planet. So, what is needed is a water level meter that can warn when the reservoir is getting low.
[I’m going to waffle for a few paragraphs now. If you want to jump to the solution, it’s below.]
Many people have added water level meters to their coffee machines by using the HC-SR04 ultrasonic sensor board (or equivalent) to bounce a signal off the surface of the water and, therefore, measure the height of the water level. This simple and cheap solution works very well for a coffee machine that has space to mount the sensor above the water reservoir, beaming downwards. The Gaggia Classic, for example, lends itself to this.
On the Baby line, on the other hand, the water reservoir is only covered by a thin plastic lid. I tried hard to get an HC-SR04 to beam a signal through the bottom wall of the reservoir and bounce it off the surface from underneath, but no dice. Reading the signals inside the HC-SR04 on an oscilloscope, there wasn’t even a trace of an echo visible from the water surface. Then I spent ages trying to think how to mount and HC-SR04 in the reservoir lid without a mess of unsightly and awkward wiring linking the lid to the machine2I pondered adding a battery to the HC-SR04 and using an LED to beam a signal through the reservoir to a photo-sensor below..
I also thought for ages about some kind of solution with a float in the water reservoir. But I came up empty handed.
The solution
Then I had an inspiration. Rather than measuring the height of the water level, I could measure the pressure in the water inlet pipe. The deeper the water level, the greater the pressure. All I needed was a T-piece in the inlet pipe leading to a pressure transducer.
I settled on the MPXV7002 pressure transducer because the MPXV7002DP variant is cheaply and easily available on breakout boards. It turns out they are popular with radio controlled aircraft enthusiasts for measuring airspeed. Go RC aircraft enthusiasts!
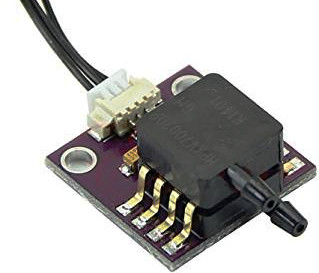 The MPXV7002DP sensor has two ports and returns a voltage that is linearly proportional to the difference in pressure between the ports. One port is connected to the water pipe and the other is left open to the atmosphere. The pressure differential is directly proportional to water level through the formula

Where P is pressure, ρ is density of water (which is pretty much 1000.0 kg/m3 for the temperatures we care about), g is the gravitational constant (9.81 m/s2) and h is the height of the surface above the level of the sensor.
For an empty reservoir, that’s around 0.2kPa and for a full reservoir it’s around 1.2kPa, depending on where you place the sensor.
The sensor has three wires: 5V, GND and signal. All you have to do is read the signal with the Arduino’s ADC and you can convert this easily to water level. It is able to measure a pressure range of -2kPa to 2kPa, which suits us pretty much perfectly.
I mounted the breakout board by installing a T-piece just under where the water comes in from the reservoir. The T-piece and sensor had quite different pipe diameters, but a bit of heatshrink worked a charm to connect them together. And the breakout board is so light that it can just hang off the T-piece via the heatshrink.
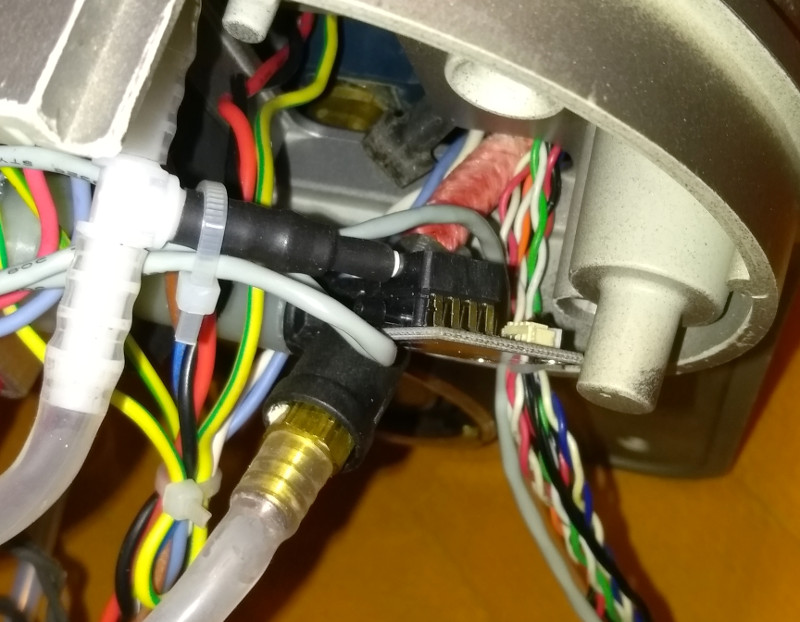
The datasheet for the MPXV7002 says you should not let water come into direct contact with the piezoresistive sensor inside the device. When mounting it, I left an air gap in the heatshrink tube from the T-piece in the hopes that this would isolate the sensor from the water. Whether the air gap has worked or not, my sensor has not developed any significant problems with measurement error.
The only caveat I have found is that the measured pressure does drift over time by up to about ±0.1kPa. This seems worse during stormy weather. I suspect when the ambient air pressure is changing rapidly (in stormy weather it can easily move up and down rapidly by multiples of 1kPa), there is a latency in how long it takes the sensor to react3This is not necessarily a limitation of the sensor itself. For all I know, it is because I let the sensor become moist or because my own piping system resists the change in pressure., so it develops an error proportional to the rate of change of pressure. As a result of this, I cannot use this sensor to get an absolute accurate measure of water level in the reservoir, but it is easily accurate enough to warn me when the water level is within 1cm of being too low. When that happens, I have programmed the on-board piezzo buzzer to sound continuously.
| ↑1 | For a double shot. |
|---|---|
| ↑2 | I pondered adding a battery to the HC-SR04 and using an LED to beam a signal through the reservoir to a photo-sensor below. |
| ↑3 | This is not necessarily a limitation of the sensor itself. For all I know, it is because I let the sensor become moist or because my own piping system resists the change in pressure. |